 Well, I promised a tutorial to Heather. I'm almost embarrassed to call it that, though, because I don't do anything elaborate and I have no pics.
The first thing I do when doing the little canvas collages is to spread on some paint. I literally pour the paint directly on the canvas from the little bottles. I kind of dot it around and then smear it with a brush until it covers the canvas. I usually add a several different colors until I like what I have. Sometimes it ends up a different color completely from what I had planned just because it didn't appeal to me after I got it on the canvas.
Once I have a background I like, I rub some off with a dry cloth. I hate waiting for paint to dry and I love the look of some canvas showing through, so I usually wipe it. Sometimes I use stamps on the paint to reveal some canvas. In that case, I don't wipe it with a cloth because that would mess up the effect.
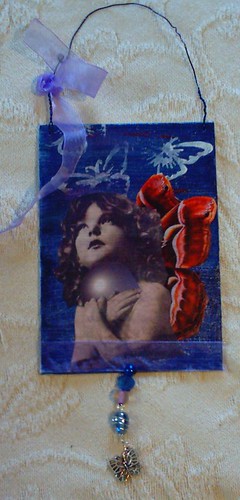
Once the paint is ready, I find pieces that appeal to me and glue them on. With the angel girl (which is probably the one collage of my own that I liked) I used a photo that I printed out from some free vintage photos on Flickr. I also found a really pretty fairy on a site dedicated to fairies. I printed one out and cut the wings from her and put them on the little girl. The little girl's arms were crossed over her chest and I wanted her to hold something meaningful. It took me a while of trying different things, but finally I cut a sun shot from National Geographic and placed the sun in her arms. I wanted to appear to be glowing and that picture worked really well. I mod podged it all down once I had it the way I wanted it and then covered it with a thin layer of mod podge, too.
I wanted to dress it up a little, so I put some ribbon across.
I poked a hole in the bottom center and put some thread (or wire...can't remember) through for beading. I used an old sharp embroidery needle to poke the holes in the canvas. I have since broken it and found that a thumb tack works even better.
I poked holes in the top in the left and right corners and put wire through. Before closing up the wire, I placed a few beads on it, then twisted it shut. I tied some more of the ribbon I used earlier onto the wire and it was done.
I think that's everything. If you haven't done a collage before, you might really enjoy it. Every now and then I come up with one I like. The rest of the time it's just fun and keeps my creative juices flowing.
I hope everyone is having a great weekend. I didn't do much today. There were a lot of good movies on so I used cleaning my room as an excuse to watch them...all day. Hey, the dresser the tv sits on needed a lot of decluttering. And all those magazines had to be looked through too. The sheets needed changing and the furniture dusted and anything else I could think of to keep me in there. A nice Saturday.
Darcy asked to see the painting I was talking about so I've added it at the top. I sold it to a very sweet blog/flickr friend a couple of weeks ago. Looking at the pic now, I realize I left something out. I brushed gesso onto a butterfly stamp and stamped them at the end. Some have the full stamp and then I let one sort of fly off the edge. I think that's all I left out. :) Oh and I also realized I didn't put beads on this particular hanger. lol But I usually do.
Heather, thanks (and thanks everyone else too!). I am really new to this so I haven't tried a lot of products. I use glossy mod podge but I hear great things about Golden Gel Medium. I want to try that one. As for paint, I use Folk Art, Delta Ceramcoat, Apple Barrel, Crafters or whatever is cheapest; just plain old craft acrylic paint. Usually one brand or another is on sale really cheap..2 or 3 for a dollar or something.
12 comments:
Wonderful tutorial...I havn't done any canvas collages so this was really interesting to me...Love all the projects you did on your break.
:-)
Your tutorial is really good...however I'd really like to see the painting you refer to. Where can I find it???
Thanks for doing the tutorial. I'm fairly new to doing collages so every bit of information I can learn helps me. I haven't done anything like this so I think I'll give it a try. I love the sun image and how it seems to glow. And the butterflies are just the right touch. Love it!!
You all are so kind. Thanks. I hope it helps you do something fun. :)
thats a very helpful set of instructions for the artistically challenged like me..lol.
Im still working on pushing watercolours about, so this is wonderful Lisa.!!
thankyou so much..
Peace, Kai.
Lisa, if anything could convince me to take to art your lovely pieces could it shows such passion.
I am sure this tutorial was a huge! help to those who need to add to their already wonderful skills.......bloggers helping blogggers wonderful isn't it!!!
:o) I do hope your day is a lovely one.
Lee-ann
Great tutorial!!!
And, I like the piece yo have sown here, the deep blue background and orange of the wings work so well together. Just lovely.
Beautiful photos of "what you did on your break", I'm impressed by your productivity!
You are soooooo creative!!!!!
'MN'
That's a great tutorial! Thank you! Two questions - what sort of paint and what sort of glue works best.
This a great tutorial Lisa! You are branching out more and more.
I use Modge Podge gloss all the time but have heard Golden is a great brand. I want to buy some golden paints as Holly uses them all the time and the colors are wonderful!!
Love you xoxoxo
It's so pretty! :) I love the blue colour, my favourite shade of blue.
Post a Comment